Lightroom Tutorial - Intro to Presets
Life with two kids doesn't really leave me with too much time for photo editing so I'm always looking for ways to get faster.
I used to bring every photo in to Photoshop to apply a curves and levels layer and would usually run some kind of action. I got pretty fast, but it could still be time consuming.
I've been shooting in RAW for over a year and all that time I've been first importing every photo into Lightroom.
But, I was only using Lightroom to adjust my White Balance, make an exposure adjustment if I needed to and maybe apply a little noise reduction.
In the last few months though I've started exploring what Lightroom has to offer. One of my favorite bloggers, Keli at Kidnapped by Suburbia is a Lightroom expert and she's definitely inspired me to spend more time learning this great tool.
I still have tons to learn, but here's where I get started these days.
A few general adjustments are automatically made when you import a RAW photo into LR. RAW photos start out looking very undeveloped and unfinished because your camera doesn't do anything to process them. So these initial adjustments kind of "finish it off" like your camera would if you were shooting JPEG.
Let's look at this adorable shot of my friend's sweet little girl.

This is what I'd call SOOC even though the initial LR adjustments have been applied.
Next, I'm going to apply my own preset. I almost always use this preset - it will:
-switch my profile to Camera Neutral, which basically applies my camera's profile to my RAW photo. The default profile is Adobe Standard, which if fine for some shots, but really isn't the best for a clean portrait. It's usally a little too red for my taste.
-bump up the vibrance to about 20. When you switch the profile to neutral it'll take away some of the color or pop you saw before. Up your vibrance and you'll see some of that come back without the red.
-bump up blacks to about 7. This is kind of like running a levels adjustment in PS.
-make a small tweak to the Tone Curve. I up the lights and bring down the darks just a bit. This small adjustment makes a big difference.
-drop the orange saturation. Often skin tones look too orange and this fixes that.
-run noise reduction at 20. RAW images have none of the noise reduction that your camera would apply to a JPEG so they almost all need some noise reduction and LR is really good at this.
So I created my own preset to do all these things with one click:

Next, I adjust my White Balance.
I think this is one of the hardest things about post processing. If you have a great white balance tip, please let me know it! I do use a gray card for newborn shoots and times when the light won't change, but I never use one outside or at home. So that means white balance is pretty much a guessing game for me.
I also thought this shot was just a smidge overexposed so I dropped the exposure and cropped it in a bit.
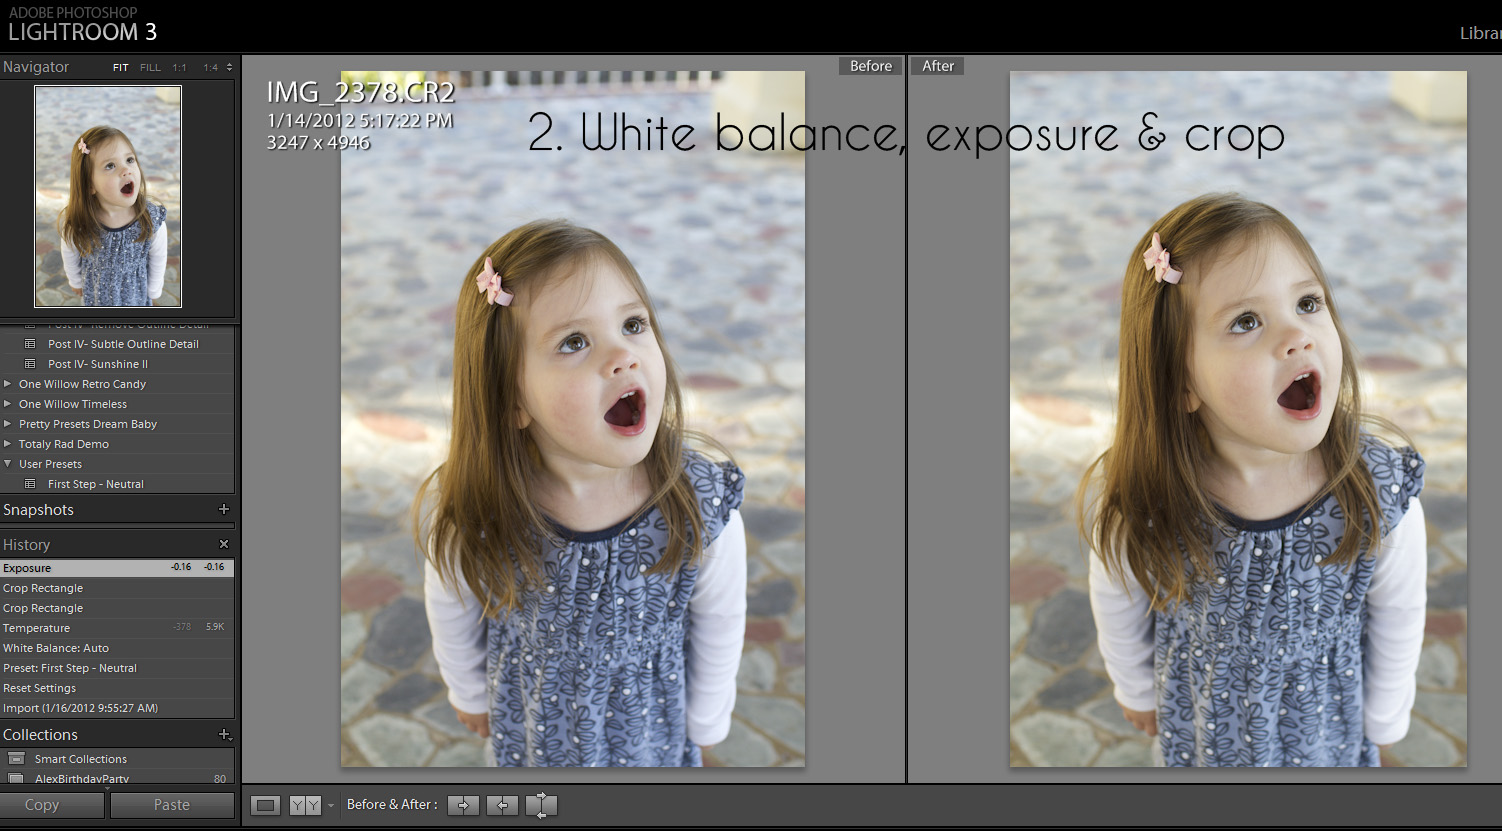
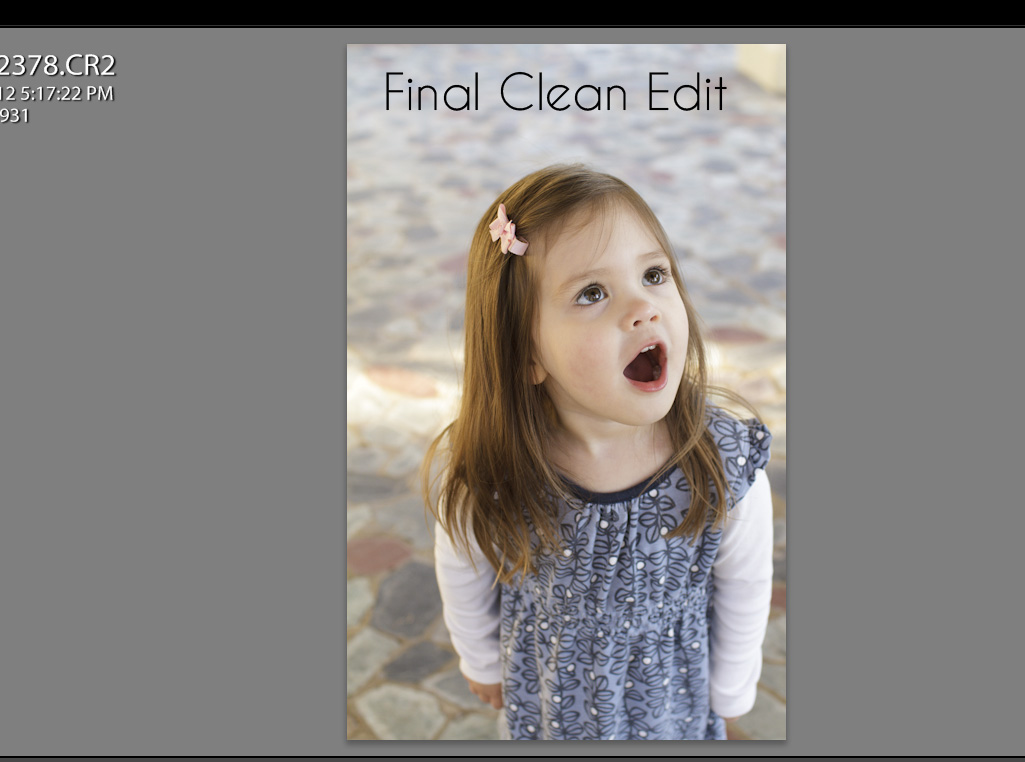
And often that would be it. I'd export the photo into PS, add my watermark, run a quick sharpening and sizing for web action and I'd be done. This is a nice, clean edit in LR. And it was fast!
(Also, if I decide I want to print this photo in the future all I'll need to do is find it in LR and export it. I don't have to have another big PS or JPEG file saved on my hard drive.)
But wait, what if I want to do something a little more artsy or processed?
This is where I still have a lot to learn. But in the meantime I can use presets. Some of my absolute favorite presets are One Willow Presets. Y'all, these are so versatile and so powerful and so pretty!
I have bought three of her five collections and really wish I'd just bought the bundle to start with because I really want them all now!
In order to decide which preset I want to use I'd just take my cursor and watch the preview in the navigator screen on the top left. When I see one that looks good I can click and try it out. And the beauty of LR? - if you don't like it, hit Ctrl + Z and it's gone. So easy!
Here I decided on the Orchid Hush from the Beautiful Things set.

I did have to adjust my WB but that's it. I didn't make any further adjustments. I was happy with it. Now often you'll have to adjust your tone curve or the fill light a bit to make a preset work, and the WB is key (again with the WB!) to making them work for your specific photo.
Y'all, Lightroom and presets can do really pretty things to your photos and they're amazingly fast.
And I'm all about fast these days since I'm usually processing while holding the baby and begging Andrew to stop dancing on the coffee table already!
{You can download a free 30 day trial of Lightroom at Adobe.}
I used to bring every photo in to Photoshop to apply a curves and levels layer and would usually run some kind of action. I got pretty fast, but it could still be time consuming.
I've been shooting in RAW for over a year and all that time I've been first importing every photo into Lightroom.
But, I was only using Lightroom to adjust my White Balance, make an exposure adjustment if I needed to and maybe apply a little noise reduction.
In the last few months though I've started exploring what Lightroom has to offer. One of my favorite bloggers, Keli at Kidnapped by Suburbia is a Lightroom expert and she's definitely inspired me to spend more time learning this great tool.
I still have tons to learn, but here's where I get started these days.
A few general adjustments are automatically made when you import a RAW photo into LR. RAW photos start out looking very undeveloped and unfinished because your camera doesn't do anything to process them. So these initial adjustments kind of "finish it off" like your camera would if you were shooting JPEG.
Let's look at this adorable shot of my friend's sweet little girl.
This is what I'd call SOOC even though the initial LR adjustments have been applied.
Next, I'm going to apply my own preset. I almost always use this preset - it will:
-switch my profile to Camera Neutral, which basically applies my camera's profile to my RAW photo. The default profile is Adobe Standard, which if fine for some shots, but really isn't the best for a clean portrait. It's usally a little too red for my taste.
-bump up the vibrance to about 20. When you switch the profile to neutral it'll take away some of the color or pop you saw before. Up your vibrance and you'll see some of that come back without the red.
-bump up blacks to about 7. This is kind of like running a levels adjustment in PS.
-make a small tweak to the Tone Curve. I up the lights and bring down the darks just a bit. This small adjustment makes a big difference.
-drop the orange saturation. Often skin tones look too orange and this fixes that.
-run noise reduction at 20. RAW images have none of the noise reduction that your camera would apply to a JPEG so they almost all need some noise reduction and LR is really good at this.
So I created my own preset to do all these things with one click:
Next, I adjust my White Balance.
I think this is one of the hardest things about post processing. If you have a great white balance tip, please let me know it! I do use a gray card for newborn shoots and times when the light won't change, but I never use one outside or at home. So that means white balance is pretty much a guessing game for me.
I also thought this shot was just a smidge overexposed so I dropped the exposure and cropped it in a bit.
And often that would be it. I'd export the photo into PS, add my watermark, run a quick sharpening and sizing for web action and I'd be done. This is a nice, clean edit in LR. And it was fast!
(Also, if I decide I want to print this photo in the future all I'll need to do is find it in LR and export it. I don't have to have another big PS or JPEG file saved on my hard drive.)
But wait, what if I want to do something a little more artsy or processed?
This is where I still have a lot to learn. But in the meantime I can use presets. Some of my absolute favorite presets are One Willow Presets. Y'all, these are so versatile and so powerful and so pretty!
I have bought three of her five collections and really wish I'd just bought the bundle to start with because I really want them all now!
In order to decide which preset I want to use I'd just take my cursor and watch the preview in the navigator screen on the top left. When I see one that looks good I can click and try it out. And the beauty of LR? - if you don't like it, hit Ctrl + Z and it's gone. So easy!
Here I decided on the Orchid Hush from the Beautiful Things set.
I did have to adjust my WB but that's it. I didn't make any further adjustments. I was happy with it. Now often you'll have to adjust your tone curve or the fill light a bit to make a preset work, and the WB is key (again with the WB!) to making them work for your specific photo.
Y'all, Lightroom and presets can do really pretty things to your photos and they're amazingly fast.
And I'm all about fast these days since I'm usually processing while holding the baby and begging Andrew to stop dancing on the coffee table already!
{You can download a free 30 day trial of Lightroom at Adobe.}
Labels: Lightroom, Photography, Photography Tutorials


2 Comments:
Great tips, Meagan! Lightroom is probably the most underutilized software on my computer. I always tell myself I'll use it more when I do some edits on it and always revert to PS. One day...
By Coneflower Ranch, At
February 9, 2012 at 1:48:00 PM CST
Coneflower Ranch, At
February 9, 2012 at 1:48:00 PM CST
OK, this has convinced me to get Lightroom. Maybe someday I'll make the jump up to PS. Thanks for making this easy to understand and giving links to other resources.
By radrn, At
May 5, 2012 at 9:37:00 AM CDT
radrn, At
May 5, 2012 at 9:37:00 AM CDT
Post a Comment
Subscribe to Post Comments [Atom]
<< Home